Category Archives: boatbuilding

Rocky’s Boatyard Trip

This month we did our annual haul out and bottom job down at Rockys boatyard on the North River in St Mary’s. It is an interesting  place.  If you love color and shape, along with some unique smells and some unique, smelly chartacters, it is worth a visit.


This is Rocky, the owner of the yard, in his 1930 ford pickup. Rocky has a “way”  with machinery.  His entourage always includes a couple of helpers and a couple of mutts that follow him from one job to the next.  He is usually driving a forklift or a crane or a hyster, or a tractor.  Sometimes his “supervisor” comes along when he is not in grade school.

A den of outliers. And out right liars. lol.


Some folks are still doing it the old fashioned way.

This is cool. A homemade vacuum. There is no end to the contraptions that evolve in a DIY yard.

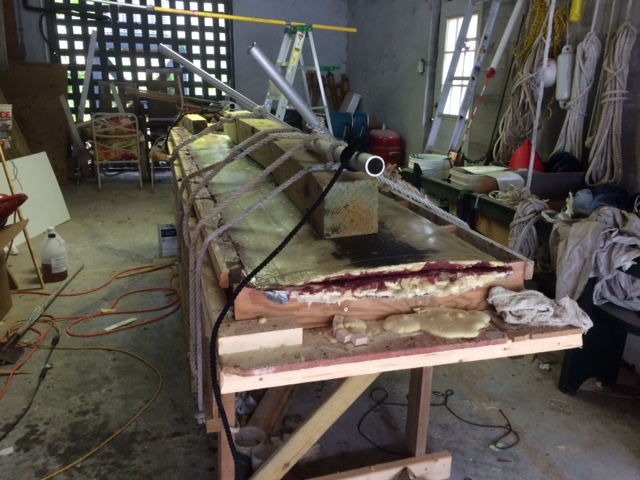
Here is a feller building a catamaran from polyethylene pipe!  Cant wait to see the finished product. This is a view of the bows. The boat is upside down at this point.

He’s got it all figured out- weight, bouancy, payload.

Yeah, I’ve tried. And Ive TRied

OK this is a sad one. She belonged to our friend Terry, who along with his shepard, Liza Doolittle, lived for years at Morningstar. We spent many fine afternoons together.  Bon voyage, Terry.  You can be happy to know she has a great new owner, working hard to bring her back into shape.

A James Wharram. Thousands of these polynesian inspired cats have been built and sailed worldwide.

Here is a close-up of the Wharram rudder. Note the lashings. Simple.

Fixer upper 🙂


I have many more, but afraid I am bogging down my computer. 🙂


A Brand New Daggerboard

The old starboard one broke clean into. I was wondering why the boat was handling so funny. Then one night at the dock, the bottom half just floated up next to the topside. Another “Maalox moment”.  It was a learning experience though. An autopsy showed that it had significant water intrusion into the balsa core right close to  the fulcrum point. Not good. When I did the layup, I thought I could seal the  heavy triax with a thickened resin as a flow coat. Those pinholes are hard to spot though, and it doesnt take but one. So the lesson is:  wet out a layer of light cloth first in the mold to help seal out the water! then do the layup.

The truth is,  the broken board took a few pretty hard whacks. One was in a lateral current up against a hard oyster bar. I think that one did it in.


This is the female mold. It has to be dead nuts flat. I used some old truss joists for the table. This time I couldn’t find a formica sheet to use for the mold so I bought one of those PVC sheets and used that (to the left in photo). DONT do it! It isn’t rigid enough and the board will come out wavy. then you have to spend all this extra time fairing the thing.

Here are the two halves being squashed together. Weights and spanish windlass.  I am too cheap to make the whole thing up and then cut out the hole for the lifting block. It is more work though. I used an old lay-up leftover from my composite boat cleats, instead of a ss eyebolt. Pour in place, two part foam goes on the tip.


The Black stuff is graphite mixed in with some resin and phenolic microballons. Actually that goes down first on the mold, then the 6 oz cloth to seal the pinholes, then the triax etc. The graphite is supposed to lube the thing up so it won’t bind up so easy. I put in on there in case I have to sand it down a little bit if it is too big for the hole. It is hard to get it just right. My new crash block won’t fit that good either, this time. Once the oysters start growing inside the trunk It is a nightmare to get it clean enough for the crashbock to slide down to where it needs to be.


More COI photos


The Certificate of Inspection. process is thorough. To date we have done a preliminary inspection,  a rigging inspection (pulling the mast), a haul out inspection, a weight strength inspection of the bow webbing (the “tramps’), a deadweight survey ( measuring the depth of keel so the designer can compute  the volume of displacement, and hence the weight of the boat) and some drills: man overboard, fire drill and abandon ship.

DCIM100GOPROGOPR3432.
DCIM100GOPROG0043446.
DCIM100GOPROG0033445.

Meet “Oscar”.  A real dummy.

DCIM100GOPROG0033862.

The man overboard drill was an eye opener. Oscar is heavy. Getting an unconscious person into the boat after a calamity is a challenge. We worked out a  retrieval  system after doing the needed maneuvers to get the boat quickly back to the victim. It is a good exercise.

DCIM100GOPROGOPR3864.


Weight Test

We are getting closer to being awarded a Certificate of Inspection! Today’s inspection  was another milestone, after the initial inspection, then the mast pulling inspection, then the haul out inspection. This was to make sure the bow nets  (made of seatbelt webbing) and their attachment points, were sound. The  procedure called for figuring the allowable number of  passengers for each net, using a square foot allowance, then multiplying the total by 180 lbs per person, then doubling that, and adding an equivalent weight to see what happens.  Fortunately nothing happened.


We used  a gasoline pump and 20 of those 30 gallon totes from Home Depot, ten per side, filled with 20+ gallons of seawater each.  3770 lbs total.

Next thing is the deadweight survey, which is a measure of the boats displacement. Then we have a couple of plan submissions yet to be returned from Washington DC. Then the final inspection, where they will count the lifejackets etc.  

Some Upgrades

The webbing used for the tramp is made for car seat belts, and comes in rolls. It suffers from UV in the Georgia sun, but if you keep it covered when not in use you can get several years out of it. Its not that expensive, but is a pain to reeve through the slots and around the fiberglass rod inserts. We used sleeves bought from the same supplier to cover the spots we had to sew at the ends. The whole thing is tensioned with a stainless steel ratchet made for truckers.

Finally finished the new lifelines and rails. They now meet USCG requirements for inspected vessels. 7/64th dyneema with spliced eye thimbles and lashings for tension, instead of turnbuckles. The lashings are covered with cutoff pieces of pex tubing. After 96 total eye splices, I have the technique down for working with 7/64th cord. The trick is in getting the taper just so and covered with snag free tape so it will work back up the inside of the weave. I used a sail needle as a kind of a fid, though you can’t attach the line to it, it makes separating the strands easier. You tube has some good tutorials.

Found a soft spot in the back corner of the bridge deck. Using a hole saw, I cut out some “biscuits” from the 4mm ply on top and dug out the saturated balsa core. The blowdryer fit nicely and after a few days off and on it was bone dry. Mixed up some phenolic microballons, aerosil, chopped fibers and resin and parged it in re- using the cutouts. All is well now.

Crashblocks

These are made of two part 6# urethane foam, that is cast in a plywood form , and then sanded into shape. Their purpose is to fit down in the daggerboard trunks behind the boards, and act as a cushion if (when) the daggerboard hits something. Without them, if you hit anything hard enough you can damage the trunk, which is glassed into the hull, even opening up a gash below the waterline. Not good.

fiberglass cloth is saturated with epoxy and laid up on the face of the crash block that will make contact with the daggerboard in a grounding or other impact.

Then it is trimmed up and smoothed out before insertion down into the trunk.

We had a hard grounding in the waterway down in Palm bay Florida. A big tupperware boat overtook us, so I eased over to the side of the channel there to let him come on by. He didn’t have sense enough to slow down- he just steamed on past at half throttle, pulling a monster wake. We whacked the bottom pretty good, and I heard the sickening crunch. The crash block was destroyed, but it saved us. No real harm done. Be careful down around Palm Bay…

Here is a new one being inserted into the daggerboard trunk.

Daggerboard back in

This is looking at it through the inspection port, belowdecks. I have some oysters growing inside the trunk, below the waterline. it is very difficult to clean the inside of the trunk without hauling the boat, or at least diving on it. I’m not that good anymore, lol. Can’t hold my breath that long and am way too buoyant. With my luck I would bump into a manatee in this murky water and have a heart attack. Guess I’ll bite the bullet and pay a diver…

Stanchion Bases

Its time to beef up the 1″ fiberglass rods that were glassed through the deck. I am bringing the handrails up to USCG standards for a Certificate of Inspection and documentation. The new handrail height will be 39 1/2 inches above deck, with an aluminum handrail. Right now they are 36 inches with para cord as the lifelines. New lifelines will be 1/8″ dyneema on 4″ spacings. It should hold Mike Tyson and Andre the Giant!

This latest project is to fabricate some nice looking bases that will glass into place above and below decks. I finally found the perfect molds- these kiddy horns from amazon. the flanges were the exactly right size, and as a bonus I now have some new boat party paraphanelia!

Some notes: After waxing the molds, I thought that I would be able to use peel ply first to get a nice surface. Disaster. So I skipped the peel ply. It is very difficult to cut the fabric to fit the whole inside circumference without wrinkles in one go. In fact, it is much easier to insert widths of fabric about 2/3rds the diameter, and then overlap with another piece. Since I wanted the finished side to be on the outside of the coves, the horns were used as female molds. lighter fabric works best. I used 9 oz uni first then some scrap 20 oz triax, but the triax is very messy by the time you get it cut that small, wet it out and lay it in there with a tongue depressor. Biax tape would be better.

Once cured they popped right out. I rough trimmed the edges with some large tin snips. It’s easier to do that when they are still green. Next operation is to cut to correct height, so that the stanchions will fit (shown), then slip them over the existing stanchion rods, fill with structural bog and set them into place.


Boat School Bears Fruit

Our good neighbors Mike and Sarah’s kids have been steadily making way on their project. It has been a great joy to watch them grow and learn over the last year. Boats are almost as fun to build as they are to actually use.

Hokule ‘a

She’s been sailing all over the Pacific for 40 years, since being built in Oahu, and now is working her way up the Eastern Atlantic coast as part of a promotional tour.

image

The book made a big impression back in the seventies. Hokule’a joined a fleet of other odd craft built in different places around that time… some made from balsa, others of papyrus reeds, The Irish had their Oxhide boats. All these modern projects had the goal of demonstrating how ancient cultures might possibly have traveled great distances around the planet. Multihulls were still a novelty, and Hokule’a did her part to help make them popular.

DSC00748

DSC00748 - Version 2

Note the long steering oar. A simple solution, but it takes some muscle. She probably balances much better though, with those crab-claw sails up. Forget that in this winding river. Definitely not an upwind boat, she is more at home in the “blue desert”, running downhill with the trades.

DSC00751 - Version 2

DSC00751

DSC00741 2

These photos were taken as she headed North, passing under the Macay river bridge (the same spot we splashed The Spirit of St Simons!). Another remarkable piece of history plies the same water that has seen so much throughout the years.

Hokule’a’s website has many more details and a gps tracker.

Thanks to Max for the heads up and to Harrison for the cool photo.